Dreaming of daily climbing practice without leaving your house? A home climbing wall is an ideal solution for beginners and seasoned climbers alike. Whether you’re training for real rock or simply want a fun way to stay active indoors, this guide will walk you through building your own climbing wall step by step.
Step 1: Choose the Right Location
Your first task is choosing where to install the wall. Consider these options:
- Garage: Ideal for larger walls with good height.
- Basement: A stable choice, but watch ceiling height.
- Spare Room or Bedroom: Use a section of the wall for a vertical or slightly overhanging setup.
- Outdoor Shed or Backyard: Make sure it’s weather-resistant.
Key Considerations:
- Minimum ceiling height: 8 ft
- Stud spacing (usually 16” on-center)
- Access to electrical outlets (for lighting or fans)
- Flooring space for crash pads
Step 2: Plan the Wall Design
Now determine your wall size, shape, and angle. Use graph paper or a simple app to sketch your design.
Types of Wall Builds:
- Vertical Wall (90°): Easiest and safest for beginners
- Overhang Wall (10–30°): Great for strength training
- Roof Section (90° overhead): Advanced but optional
Recommended Wall Dimensions:
- Width: 4–8 ft
- Height: 8–10 ft
- Angle: Start with 10–20 degrees for training
Use 3D mockups or apps like Tension Board and Kilter Board for inspiration.
Step 3: Gather Materials & Tools
Essential Materials:
- 2×6 or 2×4 framing lumber
- 3/4” plywood (ACX grade)
- T-nuts (3/8″ or 5/16″)
- Climbing holds (starter kit: 50–100 holds)
- Screws and bolts
- Optional: crash pads, gym mats, LED lights
Tools Needed:
- Drill & impact driver
- Stud finder
- Circular saw or table saw
- Level
- Wrench or socket set
- Measuring tape
Step 4: Build the Frame
- Locate the studs in your wall and mark them.
- Anchor vertical studs (2×6) directly into wall studs.
- Add horizontal support beams between verticals.
- Diagonal bracing for angled walls or overhangs.
Tip: Always use structural screws and bolts, not nails.
Step 5: Mount Plywood & Install T-Nuts
- Pre-drill T-nut holes (recommended: 6-inch grid pattern)
- Hammer in T-nuts from the back of each sheet
- Attach plywood to the frame with screws
Be sure all sheets align flush with one another for safety and ease of climbing.
Step 6: Add Climbing Holds
Install a mix of:
- Jugs (easy, large holds)
- Crimps (small, technical holds)
- Slopers (open-handed holds)
- Pinches
- Volumes (optional for variety)
Use a variety of grip types and place them at different angles and heights.
Pro Tip: Start with fewer holds and add more as you progress.
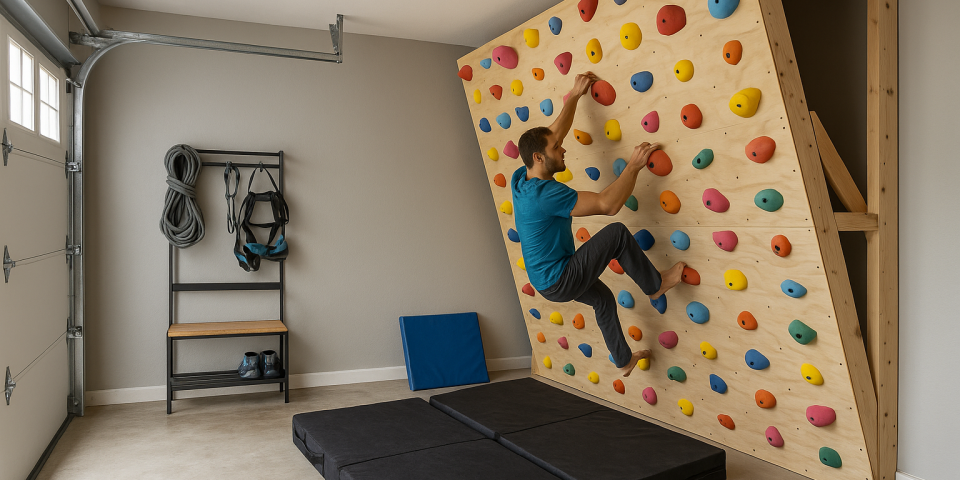
Step 7: Safety & Fall Protection
- Use crash pads or thick gym mats (at least 4”)
- Avoid furniture or obstacles around the wall
- Place a soft carpet underneath for extra safety
- Supervise kids at all times
Step 8: Customize and Train
Make your wall unique with:
- LED lighting for night sessions
- Tape or color-coded routes
- Training accessories (campus rungs, hangboards)
Training Ideas:
- Timed traverses
- Hangboard intervals
- Movement drills
- Footwork practice
Maintenance and Upkeep
- Check holds and bolts monthly
- Retighten T-nuts and clean holds
- Wipe plywood with a damp cloth
- Inspect the frame yearly for wear
Final Thoughts
A home climbing wall doesn’t need to be massive or expensive. With the right plan, basic tools, and a little sweat, you can create a personal training wall that levels up your climbing skills from the comfort of your own home.
If you’re ready to start your build, check out Bukibit’s handpicked climbing holds, safety gear, and wall-building accessories.